| Using a Handheld
Computer on the Road |
This page is written for readers of Handheld PC Magazine. If you have read my
article published there, you may like to know how to do some of the things that
I mentioned there, or you may want to know where you can locate the hardware or
software I mentioned. This page is principally directed at those who plan to
use a Handheld Personal Computer (H/PC) while on the road for extended periods
of time (such as myself). Specifically, it details the techniques involved in
transferring files to and from the H/PC without using Microsoft's Windows CE
Services software.
Here is a brief table of contents:
- The Hardware Required
- The Software Required
- Email
- Creating a Web Site
I am assuming that if you are trying to learn how to do all
this, then you actually have a Windows CE H/PC. If you don't, and you want
to purchase one, Microsoft have provided a web page where all the current
manufacturers of CE H/PC units are listed, at:
http://www.microsoft.com/windowsce/ ... Products/hpc/manufacturers.asp
I use a Hewlett Packard 620LX (recently superceded by
the Jornada 680). Details of both are available from Hewlett Packard's web
site, at:
http://www.hp.com/jornada
Obviously, a digital camera is not really required. But if you want to
illustrate your web site with photos, having a digital camera makes this so
much easier. In actual fact, any digital camera will do, but if you
are planning to travel the world and upload your photos to your web site
from a different computer every day (say, in cybercafes), then it makes
sense to use a Sony Mavica camera. It has the singularly
useful feature of using standard 3.5" floppy disks as film. Most other
cameras require special software to be installed on the computer, and
require serial cables to transfer the images from the camera. This would
mean installing the appropriate software onto every computer you came to.
With the Sony Mavica, you simply take the disk out of the camera and insert
it into the computer. The photos are available as JPEG files on the disk.
I use the model FD71 (now superceded by the FD73), but there are
(currently) four models in the line-up. More information about Sony Mavica
digital cameras can be found on Sony's web site, at:
http://www.sel.sony.com/SEL/consumer/ ... dimaging/browse_the_products/
... digital_mavica_camera/mavica_models/index.html
|
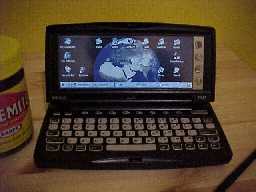
The Hewlett Packard 620LX

The Sony Mavica FD71 |
The standard software used to transfer files between a Windows CE computer
and a Windows 95/98/NT computer is Microsoft's Windows CE Services (or
the more recent ActiveSync). As anyone who has ever tried to use this
has found, it is a large and sophisticated (and sometimes problematic) piece of
software. It can take a couple of hours to install, configure and synchronise.
If you are travelling the world with your CE computer, it is clearly
inappropriate to try to install WinCE Services on every cybercafe computer that
you want to exchange data with.
I have found an alternative. Two pieces of software are required. One, called
WCEFiler, runs on the CE H/PC, and the other,
called Transfile, runs on the Windows desktop/laptop. When
running, they communicate with each other via the H/PC serial cable that came
with the unit, and allow the user to exchange files (only files, nothing else).
They are both freeware and downloadable from the Internet. They are also both
very small and simple to use.
These programs require a bit of setting up, but once they are installed and
configured, their use is actually very simple.
They will work with any Windows CE H/PC, not just Hewlett Packards. They will
work with all versions of Windows CE, even 1.0. I'm not sure if they will work
on P/PC's - maybe they will, but I've never tested them.
The system I'm describing has three drawbacks:
- When WCEFiler is running on the CE device, it hogs virtually all CPU
resources, so any other programs running on the device will run verrrrry
slowly. So when you're transferring files, don't bother trying to do anything
else.
- Transfile is a Windows 3.1 program, and as such will not recognise files
on the CE device that have names longer than 8 characters (or
extensions longer than 3 characters, or spaces anywhere in the name). Files on
the PC will be recognised, but the names will look something like
MYDOCU~1.DOC. There is no way around this. Files on the H/PC
with longer names will simply not be shown. This includes folders as well,
such as My Documents. You will not be able to access any
files in the My Documents folder on the H/PC, or its
sub-folders. This is very annoying. An alternative is to rename your files and
folders. But this doesn't truly solve the problem, as My Documents
cannot be renamed on the H/PC. Another alternative is to copy all files you
wish to transfer into the Temp folder and give them compliant
names, or create a new folder with a short name, like mydocs.
- All files transferred (in either direction) will have their filenames
converted to upper-case. This can be annoying from an aesthetic point of view,
but everything will still work fine.
If these drawbacks are okay for you (they are for me), then read on.
This is a small program that runs on the Windows CE H/PC that emulates the
Filer software communications from the old, DOS-based Hewlett
Packard 200LX. In other words, when it is running on your H/PC, your H/PC is
pretending to be (emulating) a HP 200LX palmtop for the purposes of serial
communications. WCEFiler simply sits there and processes any requests for file
transfers that it detects on the serial cable. It can be thought of as a
server that will work in conjunction with any desktop/laptop software
designed to communicate with a HP 200LX (like Transfile).
Where to find it
I can no longer find the site that I originally downloaded this program from.
It seems to have disappeared. I can find no mention of it in any of the
standard CE shareware repositories. So if you want it, you can download it from
my web site, at the following address:
http://www.zip.com.au/~mvirtue/downloads/wcefiler.exe (22Kb)
Installation
Download the file from the above address and store it on your
desktop/laptop's hard disk.
Copy the file into the Windows folder on your H/PC. This
needs to be done using WinCE Services, as follows:
- Ensure your device is connected to your PC
- Locate the downloaded file on your hard disk using Windows Explorer
- Highlight the file and select Copy from the Edit
menu
- Open the Mobile Devices folder within My Computer
- Double-click on the device that you want to copy it to
- Double-click on the My Handheld PC icon
- Double-click on the Windows icon
- When the Windows folder file list appears, select
Paste from the Edit menu
Create a shortcut to the new program on your H/PC's desktop (or anywhere), as
follows:
- Double-tap My Handheld PC on your H/PC's desktop
- Double-tap the Windows icon
- Locate the newly copied file (wcefiler.exe) and highlight
it
- From the Edit menu, select Copy
- Display the H/PC's desktop (Windows-M is a nice shortcut
key for this)
- While holding down the Alt key, tap the background of
your desktop
- Select Paste Shortcut from the menu that appears
Modify the shortcut to start the new program at the fastest possible speed
(56k), as follows:
- While holding down the Alt key, tap the new icon for the
program (Shortcut to wcefiler)
- Select Properties from the menu that appears
- Select the Shortcut tab of the Properties
box
- Add 57600 to the end of the command-line (outside the
double-quotes), so that it reads "\Windows\wcefiler.exe" 57600
- Tap OK
One final step - do this only when you don't plan to use WinCE Services for a
while. The automatic communications of your H/PC must be disabled, otherwise
everytime you start the HP Transfile software on your PC, your
H/PC will think that it's WinCE Services starting, and respond by automatically
launching the standard PC Link software.
- Open Control Panel on the H/PC (Start/Settings/Control
Panel)
- Double-tap Communications
- Select the PC Connection tab from the
Communications Properties box
- Uncheck the box Allow connection ....
- Tap OK
WCEFiler is now installed and ready to run at its fastest speed.
Usage
Double-tap the new icon - when WCEFiler is running it should look like this
(it is waiting for a connection from the desktop/laptop):
No further interaction with WCEFiler is required while it's running. When
communications with the desktop/laptop are done, the program should be simply
closed.
This is the other half of the pair - the client to WCEFiler's
server.
This is a program provided free by Hewlett Packard to owners of 200LX palmtop
computers, however anyone can download it. The neat thing about it is that is
will communicate seamlessly with WCEFiler (which is emulating a 200LX). Its
sole purpose in life is exchanging files with palmtops.
Where to find it
Transfile is available for download from HP's web site, at the following
address:
http://www.hp.com/cposupport/handheld_computers/software/tf103.exe.html
(775Kb)
Installation
Installation of Transfile is as follows
- Download the file from the above address and store it in a temporary
folder on your desktop/laptop's hard disk
- Open Windows Explorer and locate the downloaded file
- Double-click on the downloaded file. Several files will be extracted and
placed in the same folder.
- Locate the newly-extracted Setup.exe and double-click on
it
- Follow the setup instructions. Take note of the name of the folder that
the program files are installed into
- Once the setup program is finished, all files from the temporary folder
can be safely deleted
If you are planning to take your H/PC travelling with you, locate the folder
that the Transfile program files were installed into, and simply copy all the
files therein onto a single 3.5" floppy disk. Keep that disk with your H/PC
(and its cable, of course) while you travel.
Note: Some of the program files in the Transfile folder are "hidden."
This means that you will only be able to copy them to a floppy disk if you
first make them visible. This is done by using the Options
option from the View menu of Windows Explorer.
Usage
Before you start Transfile, ensure that:
- Windows CE Services is not running on the computer (or if it is, ensure
that serial communications are disabled - to disable serial communications,
right-click on the WinCE Services icon in the tray (lower-right-hand corner of
the screen next to the clock) and un-tick Enable Serial Connection)
- The H/PC is connected to the PC with the serial cable
- WCEFiler is running on the H/PC
If you are using Transfile on the PC that is was originally installed on:
- locate the Transfile program icon (usually in Start/Programs/TRANSFILE
WIN 200) and click on it
If you are running Transfile from a floppy disk:
- Insert the floppy disk
- Click on the Start button and select Run
- Type in A:\tfwin200.exe
- Click OK
Transfile will start and automatically determine which serial port the H/PC
is connected to, and at what speed. As soon as it has established a connection
with the H/PC, the right side of the screen will show the names of files on the
H/PC.
The screenshot below shows the Transfile software running on a desktop
computer and connected to a H/PC.
To copy files back and forth, simply click on the name of a file (from either
side) and drag it to the other side. Multiple files can be selected with
Shift-click or Ctrl-click actions. Files and folders can also be deleted and
renamed.
If, during a file transfer, the H/PC auto-powers-off, simply turn it back on
again - the current transfer will resume unaffected.
This section details how to send and receive email without a card modem and
without WinCE Services.
Using this technique you can dramatically reduce the amount of time you spend
online (in expensive cybercafes, for example). Essentially, you write all your
emails on your H/PC, taking as much time as you need, and only spend a few
minutes connected to the Net sending them. Any emails you receive you transfer
straight to the H/PC before reading them, and read them later, when you're not
paying for connect time.
All that is required is a Windows PC with an Internet connection (such as one
might find in a cybercafe). It is assumed that you have an email account that
you can access from that PC, and that you have a Windows CE H/PC with a serial
cable.
- Obtain, install and configure WCEFiler on your H/PC (as described above,
here)
- Obtain, install and configure HP Transfile on the PC or on a floppy disk
(as described above, here)
- On the H/PC, fire up Pocket Word and write all the emails that you plan to
send. You can use a single file to store all the messages, or you can store
each message in a separate file
- Save the messages as a text files - not Pocket Word
documents. To do this, select Save from the File menu, then
select Plain Text Document (*.txt) from the Type list in the
Save As box. Note: Do not use any spaces in the filenames, and ensure
that the names of the files and the names of the folders they are stored in
are less than 8 characters long, otherwise the files will not be able to be
transferred
- Connect the H/PC and the PC using the serial cable and the WCEFiler and
Transfile software (as described above, here) and
transfer all the text files to the PC
- Start Windows Notepad (Start/Programs/Accessories/Notepad)
and open the file (or files) that you just transferred
- Connect to the Internet
- Either start your email program, or start your browser (Netscape or
Internet Explorer) and browse to your web-based email page (such as
Hotmail or
Yahoo)
- Compose a new, blank message, and fill in the To, CC and
Subject fields
- Switch back to Notepad (use Alt-Tab or click on the program's name
in the Taskbar at the bottom of the screen)
- Highlight the text that will form the body of the message you are about to
send
- Copy the text to the Windows clipboard (use Copy from the Edit
menu, or Ctrl-C)
- Switch back to your blank email message
- Click anywhere in the blank body of the message and paste the text from
the clipboard (use Paste from the Edit menu, or Ctrl-V)
- Send the message
- Repeat steps 9-15 for all the messages you want to send
To transfer email messages that you have received onto your H/PC for offline
reading:
- In your email program (or web page), open the message that you wish to
copy
- In the body of the message, highlight all the text that you want to copy
(use Select All from the Edit menu, or Ctrl-A, if you
want all the text)
- Copy the selected text to the clipboard (use Copy from the Edit
menu, or Ctrl-C)
- Switch to Notepad (use Alt-Tab or click on the program's name in
the Taskbar at the bottom of the screen)
- Create a new file (use New from the File menu)
- Paste the message text from the clipboard into this new file (use Paste
from the Edit menu, or Ctrl-V)
- Save the file, remembering that the filename should have 8 or less
characters (and no spaces)
- Repeat steps 1-7 for each message you wish to transfer
- Disconnect from the Net
- Ensure that WCEFiles is running on the H/PC, and that Transfile is running
on the PC
- Transfer the new files to the H/PC (as described above,
here)
You will be able to read the copied messages using Pocket Word.
This section is supposed to be about how to create and maintain a web site on
the road, using a H/PC and a digital camera.
It is a little too huge a task to describe all the intricacies of web
publishing, HTML, digital image management and web site layout. There are many
fine books that cover these subjects. So I regret to say that you won't find a
web publishing tutorial here.
All the skills required are general in nature. In other words, none of the
skills you need is specific to travelling the world or using a H/PC. The only
skill I developed specifically for this trip was transferring files to
and from the H/PC without using Windows CE Services. The bulk of this page has
been devoted to exactly that issue, so if you read and understood that, then
you have all the specific skills you need. All you need to learn is general web
management. :)
However, for those of you interested in the broad and general steps involved,
they are detailed here.
This entire web site was created using just these steps. Feel free to check
out the rest of the site, here.
If you have any comments about this page (or any of the others), you can
submit them here, or feel free to contact me,
at
mark@virtualcreations.com.au, if you would like any more detailed information
about any of this.